Your home. Organized.™ Your move. Easier.™
Serving the entire San Francisco Bay Area | Gayle Grace, 510-654-7983

Wednesday, September 30, 2009

How to store paper...

While pads of paper or bound paper can stand vertically, all loose paper needs to be stored horizontally. There are several ways to do this successfully, depending on your space. Stacking letter trays may be "old school", but they work. Boxes can keep quality paper clean and wrinkle free and be neatly stacked on a shelf.


Wednesday, September 23, 2009

Organizing your office

Whether you work from home or off-site, if you are trying to grow your business and do your best work, I urge you to take a good look around your office and ask yourself if it is supporting your goals.

Do you look forward to going into your office everyday?
Do you know where to find the things you need in short order?
Do you feel comfortable having others come into your office?
Does your office support your growth or hold you back?
Is your office performing at the same level you are?

If you are answering NO to any of these questions, then it's time to organize your office. Many of us have offices that look like this one.


The desk drawers are stuffed...


While the cabinets are under utilized...


What did we do to get this office unstuck? We gathered all the papers and whatnots and separated them into categories. We separated the current/active files from the old/dead files. We removed anything that did not belong in the office. Then we reassigned homes to all items that were left.


We used some organizing supplies to keep items separated and easily available in the drawers.


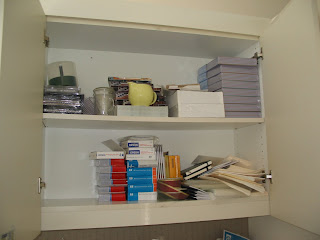
We utilized the over head cabinets for marketing materials and client supplies.


Our client was thrilled with the results and can now concentrate on growing the business, with confidence!

Wednesday, September 16, 2009

The art of hanging art


Toni Berry, of Marie Antoinette Interiors, answers our questions about hanging art:

Q. Toni, we are really struggling with hanging our artwork. Can you give us some tips?

A. Yes, I certainly can.

Hang things closer together rather than farther apart. I often use the width of the frames as the spacing between pieces, and very rarely hang pictures more than two inches apart.

Hang things lower rather than higher. In general, artwork should be hung so that the center point of the picture, or grouping, is at eye level for the average person. (5 1/2 feet from the floor is the "universal" eye- level height).

Don't get stuck in the rut of hanging all of your art in a predominately horizontal arrangement. Create interest and visual excitement by hanging several pieces in a vertical "stack". When hanging 2 pieces one under the other, go for the unexpected - hang the larger piece above the smaller one to avoid a "bottom heavy" look. Or try propping a piece against a wall or mantel, not hanging it at all, this works great for mirrors too!

Relate artwork to the furniture below it. When hanging art over a table or sofa, for instance, the bottom of the frame should sit within 4-8" of the furniture below and its width should be less than that of the furniture.

Bigger is often better even in small spaces. One large painting can make a real statement, keep things simple, and draw attention to a room's focal point, like a fireplace or sofa.

Still need help hanging your art creatively? Marie Antoinette offers art placement and hanging services - give Toni a call at 925 862-9064.

Wednesday, September 9, 2009

Which way does it go?


Rooms have a direction and a flow. Generally, you look for some architectural detail to establish the direction. A fireplace, windows, doorways and halls all help determine where the focal point is and what direction the room is meant to take.

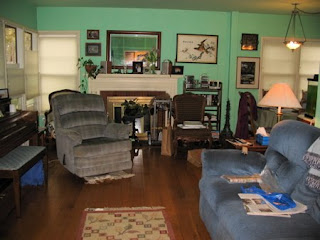
In the photo above, while the natural focal point is the fireplace and windows, this small living room got turned in the opposite direction because the TV was placed in opposition to the fireplace.


In this photo of the same room, we returned the room to its intended direction, making the fireplace the focal point it was intended to be.

There is no doubt that a television set has probably caused more conflict in the natural direction of a room than any other piece of furniture. If a room is large enough to allow for separation of the space then putting the TV on the opposite side of a fireplace or window/door will probably work out. But in a small space, splitting a room just doesn't work, so adding the TV to the focal area, say above or next to the fireplace, is your best bet. In this case we were able to relocate the TV to another room entirely.

Wednesday, September 2, 2009

Transform our house, part 2

So, to continue our home transformation story....

After the garage was cleaned out, several garage sales were held, the piano was sold, the fish tank was given away, the office was built in the back of the garage and the media room was in place - we then worked on the living room/dining room.

The living room and dining area are an L shaped space. The dining room is the small part of the L. The living room, which is the large part of the L is also a passage way into a hall leading to the bedroom, bathroom and media room. The fireplace and the main windows are on the opposite part of the long L.

Once the color palette was agreed on, we could work on choosing new rugs and a few new furniture pieces. Fortunately they already had some beautiful chests and chair which were inherited and in great condition. The chairs would be recovered to mix with new furniture being purchased.

After the new furniture arrived and the recovered pieces were done, we went about arranging the rooms. The important thing we did was to establish the room direction. Before everything in the space pointed to a giant TV in the corner of the small L of the room. Now, each area is treated as a separate space and the fireplace gets to once again be the center of the livingroom.

Here's the result... now when you walk in the front door, you are greeted by this beautiful library and reading area.


Where the giant TV use to be, a comfortable leather chair now resides.


The living room now centers around the fireplace.


The dining area has gained some room to move around in and the china cabinet can be the center of attention.


Needless to say, the homeowners are thrilled. All their hard work has paid off beautifully. They love being at home and entertaining their friends. This project was taken 2 years and there are still things they want to do... but they are loving every minute of the process and I am thrilled to have played a role in this story.

Wednesday, August 26, 2009

Please, transform our house

This is the story of a home transformation. It starts in 2007, when an East Bay couple emailed me for help. Could I work with them to change their small "cottage" type home into the place of their dreams? Could it be done on a budget and could they do most of the labor themselves? Fortunately, the answer was YES to almost all their requests. And this is how we worked together to do it.

First, I went to the house, met them and photographed all the rooms. We talked briefly about what was on their wish lists. Then I went home and prepared the photos, gathered some ideas and met with them again for an extensive interview. We talked outside in their lovely backyard and when I showed them the photos of their house, they were shocked. Even though they lived in that house every minute - seeing it in a photo gave them a whole new perspective on what their home actually looked like.


I talked to them for quite some time because we needed to come to an agreement on the most basic issues of style, color, room uses, fabrics, flooring - everything about how they wanted their home to look and feel. The breakthrough came when I discovered that they both loved the homes they saw on their trips to England and Ireland. They both loved "The Hobbit" and "Lord of the Ring" movies. They wanted a "hobbit house". Cozy, earthy, soft and comfortable. They both love to read, listen to music and watch movies together at home. This gave me the direction I needed.

After the interview we went back into the house and walked it room by room. By the end of the session we agreed: the TV had to have its own space, so the spare room/office would move out and the TV would move in there. The office would move to a new space built in the back of the garage just for that purpose. With the TV out of the main part of the house, the livingroom/diningroom could expand into the whole space.

Fortunately, they had a contractor who could do the work in the garage to create the new office space. Of course, that meant that the garage had to be cleaned out. A whole story unto itself! But that happened and several months later, they had a beautiful private office and exercise area. Which meant they could now concentrate on the new TV/movie room.

We decided to turn the room into a real home theatre. The walls are painted a lovely dark burgundy, the trim and ceiling are dark blue and the curtains are dark velvet. Comfortable theatre seating was created and I am still lobbying for the popcorn machine! They love going into this room to close out the world and snuggle up to a movie.

In my next post I'll continue this project and you'll get to see the above rooms as they are now... trust me, it's worth the wait!

Sunday, August 23, 2009

Brightening your work day

I've become a big fan of Mudlark Stationery products. Beautiful colors and thoughtful designs to brighten/lighten up your home office. Find at any good stationery/card shop, as well as on-line.


Related Posts with Thumbnails